Creating a Cornell-Themed Catch-All Bowl with Onefinity CNC: A Graduation Gift
Introduction
Graduation is a milestone worth celebrating with a personalized gift that reflects the recipient’s achievements and future endeavors. One such thoughtful and handcrafted gift is a custom catch-all bowl made on a Onefinity CNC machine, filled with vibrant epoxy colors. In this blog post, we’ll walk through the creation process of a Cornell-themed catch-all bowl, highlighting the steps involved in machining and curing the epoxy for a stunning final product.
The Inspiration Behind the Gift
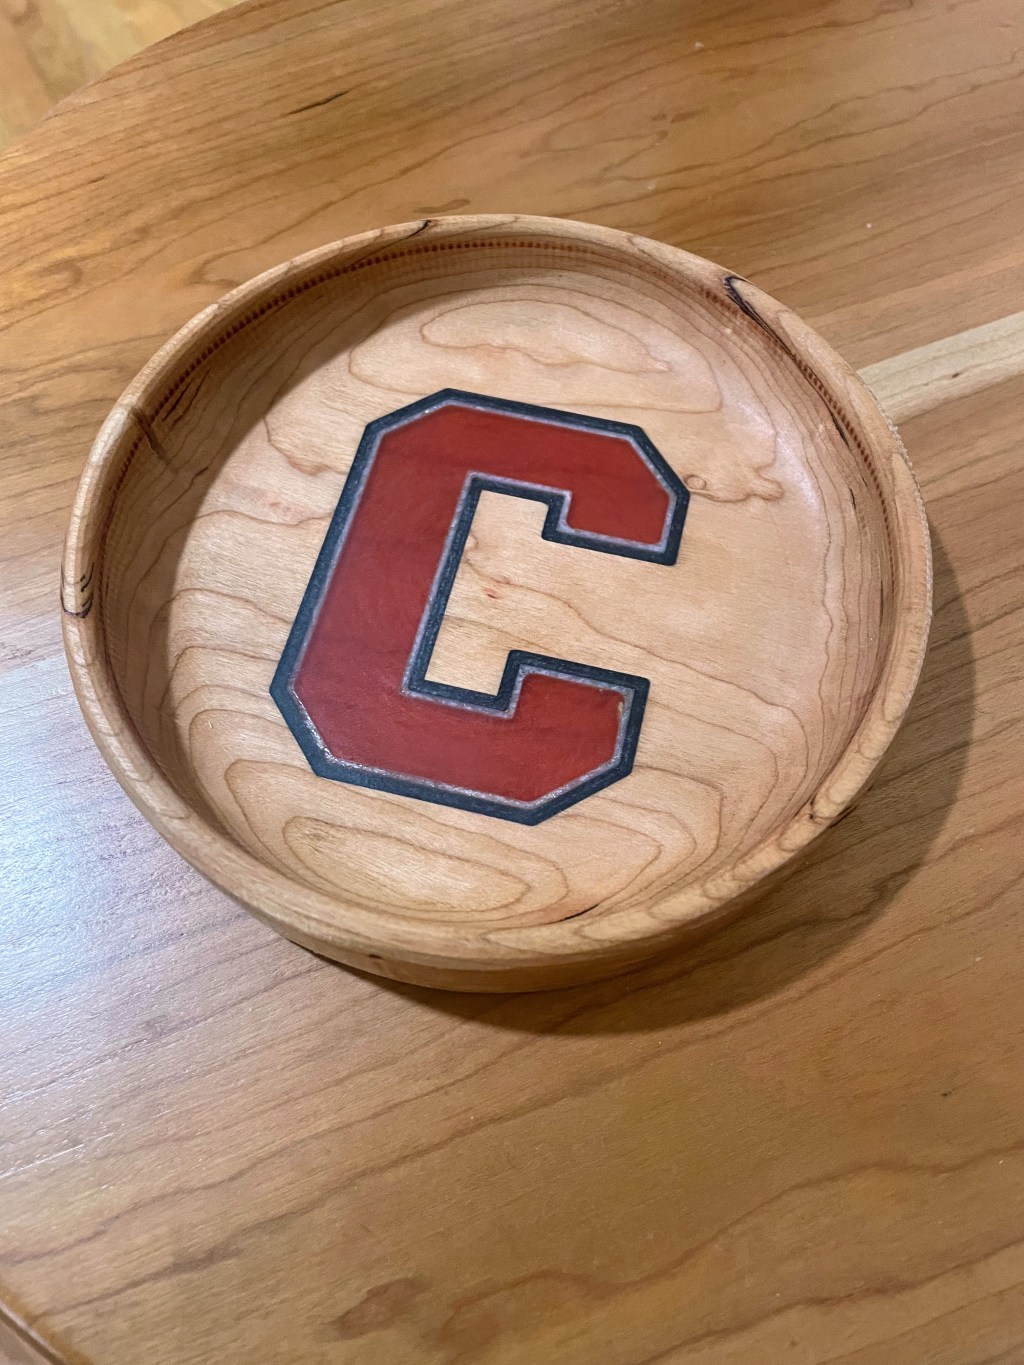
This particular catch-all bowl was designed as a graduation gift for someone heading to Cornell University. The bowl’s design features the iconic Cornell “C” in bold red epoxy, surrounded by white and black outlines, set against the natural beauty of the wood. The combination of wood and epoxy not only makes for an eye-catching piece but also serves as a practical item for the recipient to use and cherish.
Materials and Tools Used
- Cherry Wood: The base material for the bowl.
- Epoxy Resin: Red, white, and black colors.
- Onefinity CNC Machine: For precision machining.
- Clamps and Fixtures: To secure the wood during machining.
- Sandpaper: For finishing the bowl.
Step-by-Step Process
1. Designing the Bowl
The process begins with designing the bowl and the Cornell “C” in CAD software. The design is then transferred to the Onefinity CNC machine, which will execute the precise cuts and carvings needed.
2. Initial Machining
The first step in machining is to carve out the areas where the epoxy will be poured. The CNC machine is set up to carve the “C” and the surrounding areas, creating clean and precise cavities for each layer of epoxy.
3. Pouring the First Layer of Epoxy
Once the initial machining is complete, the first layer of epoxy is mixed and poured. In this case, the red epoxy is poured into the “C” cavity. The epoxy is allowed to cure fully, which can take a day or more depending on the resin used and environmental conditions.
4. Secondary Machining and Pouring the Second Layer
After the red epoxy has cured, the CNC machine is set up for a second operation. This time, it carves out the surrounding area for the white outline. Careful precision is required to ensure the new cavity aligns perfectly with the cured red epoxy. The white epoxy is then mixed and poured into the newly carved cavity and allowed to cure.
5. Tertiary Machining and Pouring the Third Layer
Once the white epoxy has cured, the CNC machine is set up for the final machining operation. This step involves carving out the area for the black outline. The black epoxy is mixed and poured into the new cavity and left to cure completely.

6. Final Machining and Sanding
With all three epoxy layers cured, the CNC machine completes any final machining necessary to shape the bowl. This includes smoothing out the surface and ensuring the edges are clean. The bowl is then sanded to a fine finish, highlighting the contrast between the wood and the epoxy.
The Finished Product
The result is a beautifully crafted catch-all bowl that combines the natural aesthetic of wood with the vibrant colors of epoxy. The bold Cornell “C” stands out prominently, making this bowl a perfect and meaningful gift for a new Cornell student.
Conclusion
Creating a custom epoxy-filled catch-all bowl with a Onefinity CNC machine involves careful planning, precision machining, and patience during the curing process. The effort is well worth it, as the final product is both functional and visually striking. This Cornell-themed bowl is not just a gift, but a piece of art that will remind the recipient of their achievements and the journey ahead at Cornell University.
Whether you’re looking to create a similar graduation gift or explore other woodworking projects, the combination of CNC machining and epoxy resin offers endless possibilities for creativity and personalization.

Leave a comment